WEEK 9
Posted: Thu Jun 18, 2015 1:31 pm
LESSON 28
TOPIC: SCALE DRAWING
OBJECTIVE: At the end of the lesson, the students should be able to:
1. Define scale drawing.
2. Mention the types of scale.
CONTENT:
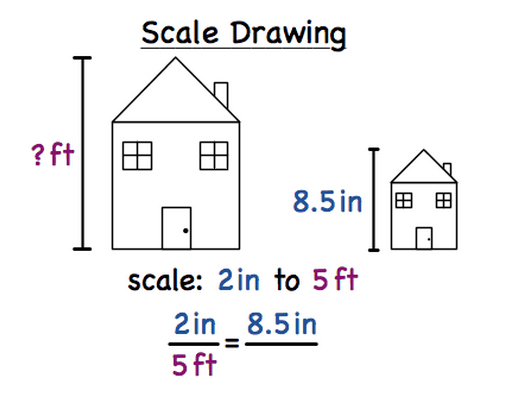
Scale drawing is the drawing of a reduced size or an enlarged size of an object. Scale is usually given as a ratio and they are stated in the title block. Scale drawing is different from ordinary drawing or sketching because it provides an accurate representation of the object under consideration.
MAJOR MATERIALS FOR SCALE DRAWING
1. Metric rule
2. Scale rule
TYPES OF SCALES USED IN DRAWING
1. The full scale on size
2. Reduced scale drawing
3. Enlarged scale drawing
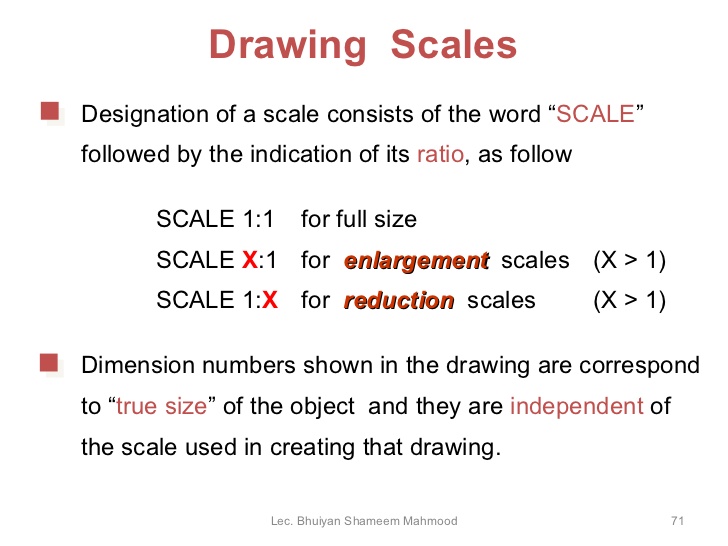
Full Scale: in this case, an object is drawn to its size in all dimensions. Full scale is 1:1.
Reduced Scale Drawing: is used when the object is too big. The actual size of the object is reduced in proportion to the drawing. E.g. scale ratio 1:2, 1:5, 1:50 etc.
Enlarged Scale Drawing: is used when the object to be drawn is too small to be clearly seen. In this case, the actual size of the object is enlarged in proportion to the drawing. Examples of enlarged scales are 2:1, 10:1, 20:1 etc.
EVALUATION:
Define scale drawing.
Mention types of scale
LESSON 29
TOPIC: DRAWING OF OBJECTS TO SCALE
OBJECTIVE: At the end of the lesson, the students should be able to:
1. Use the metric scale properly.
2. Draw a given shape to full scale, reduced scale and enlarged scale.
CONTENT:
Draw the shape below in
(a) Full scale i.e. 1:1
(b) Reduced scale 1:2
(c) Enlarged scale 2:1
Full-scale Drawing
Some woodworkers like to create full-scale orthographic drawings in addition to the reduced scale ones. There are several reasons to consider making a full-scale drawing: the proportions and details can be reconsidered, direct measurements for components can be easily retrieved, and templates for curved and irregular parts are ready-made. On the other hand, full-scale drawings are not practical if the object to be built is rather simple or if it is quite large.
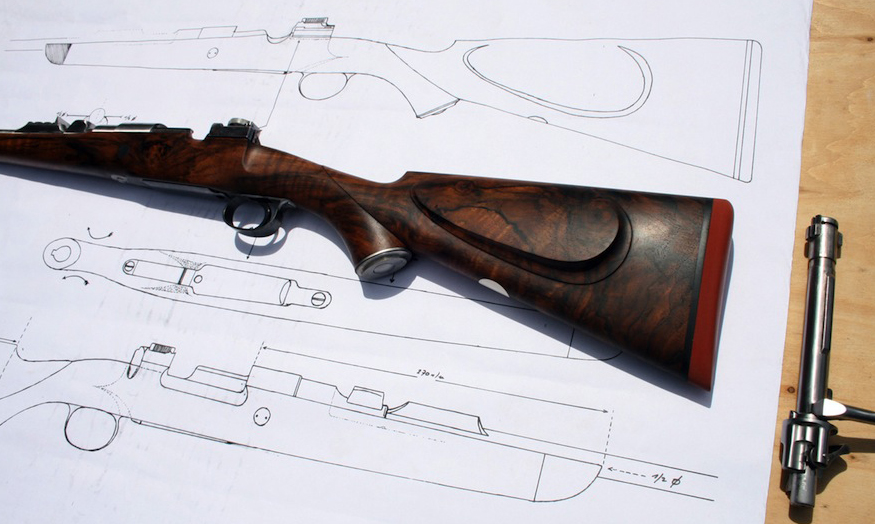
Full-scale drawings can be drawn in the same manner as reduced-scale drawings but they often include more detail - wood grain orientation, joinery, edge profiles, screw hole locations, etc. Hidden structures can be penciled in with dashed lines or with a different color. Separate detail drawings and cross sections are another way to show hidden parts.
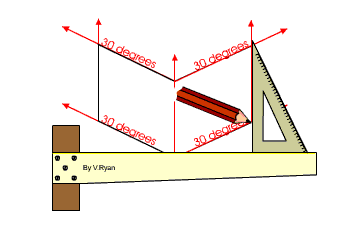
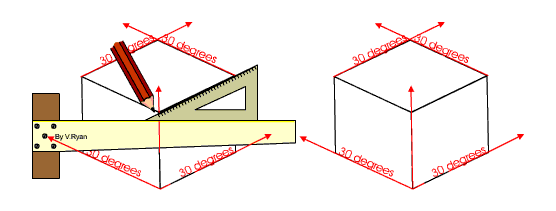
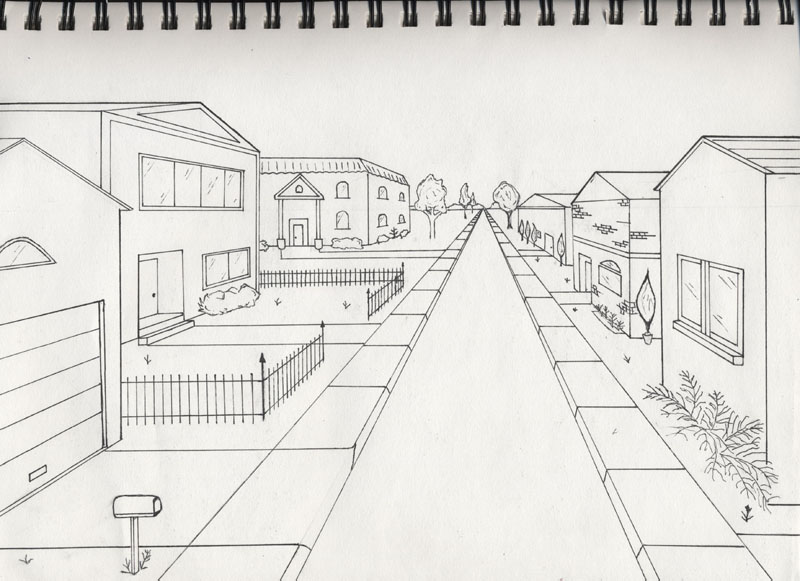
Perspective Drawing
A perspective drawing is similar to a photograph: as the lines of an object recede toward the back, they appear to converge or become closer together. The advantage of a perspective drawing over scale and full-size drawings is that the object looks more like what our eyes perceive if we viewed the actual object. That is, a three-dimensional perspective is provided.
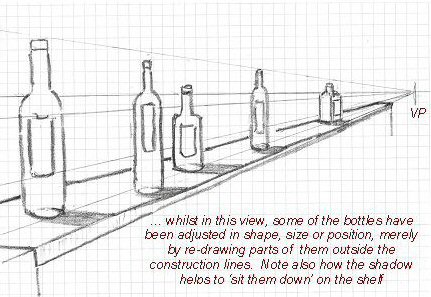
Perspective drawings can be time-consuming to make and are not essential for building a furniture piece if the other drawings are done well. They do have their place in the commercial world however, and they can be fun to make. An overview of perspective drawing can be found in most text books on mechanical drawing.
https://youtu.be/vvGXwjSZoVc
EVALUATION:
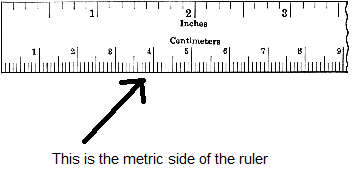
Mark out some values from the metric rule e.g. 27mm, 136mm, 40mm etc.
ASSIGNMENT:
Draw the shape below in scale 1:1 scale 1:5 and scale 4:1.
TOPIC: SCALE DRAWING
OBJECTIVE: At the end of the lesson, the students should be able to:
1. Define scale drawing.
2. Mention the types of scale.
CONTENT:
Scale drawing is the drawing of a reduced size or an enlarged size of an object. Scale is usually given as a ratio and they are stated in the title block. Scale drawing is different from ordinary drawing or sketching because it provides an accurate representation of the object under consideration.
MAJOR MATERIALS FOR SCALE DRAWING
1. Metric rule
2. Scale rule
TYPES OF SCALES USED IN DRAWING
1. The full scale on size
2. Reduced scale drawing
3. Enlarged scale drawing
Full Scale: in this case, an object is drawn to its size in all dimensions. Full scale is 1:1.
Reduced Scale Drawing: is used when the object is too big. The actual size of the object is reduced in proportion to the drawing. E.g. scale ratio 1:2, 1:5, 1:50 etc.
Enlarged Scale Drawing: is used when the object to be drawn is too small to be clearly seen. In this case, the actual size of the object is enlarged in proportion to the drawing. Examples of enlarged scales are 2:1, 10:1, 20:1 etc.
EVALUATION:
Define scale drawing.
Mention types of scale
LESSON 29
TOPIC: DRAWING OF OBJECTS TO SCALE
OBJECTIVE: At the end of the lesson, the students should be able to:
1. Use the metric scale properly.
2. Draw a given shape to full scale, reduced scale and enlarged scale.
CONTENT:
Draw the shape below in
(a) Full scale i.e. 1:1
(b) Reduced scale 1:2
(c) Enlarged scale 2:1
Full-scale Drawing
Some woodworkers like to create full-scale orthographic drawings in addition to the reduced scale ones. There are several reasons to consider making a full-scale drawing: the proportions and details can be reconsidered, direct measurements for components can be easily retrieved, and templates for curved and irregular parts are ready-made. On the other hand, full-scale drawings are not practical if the object to be built is rather simple or if it is quite large.
Full-scale drawings can be drawn in the same manner as reduced-scale drawings but they often include more detail - wood grain orientation, joinery, edge profiles, screw hole locations, etc. Hidden structures can be penciled in with dashed lines or with a different color. Separate detail drawings and cross sections are another way to show hidden parts.
Perspective Drawing
A perspective drawing is similar to a photograph: as the lines of an object recede toward the back, they appear to converge or become closer together. The advantage of a perspective drawing over scale and full-size drawings is that the object looks more like what our eyes perceive if we viewed the actual object. That is, a three-dimensional perspective is provided.
Perspective drawings can be time-consuming to make and are not essential for building a furniture piece if the other drawings are done well. They do have their place in the commercial world however, and they can be fun to make. An overview of perspective drawing can be found in most text books on mechanical drawing.
https://youtu.be/vvGXwjSZoVc
EVALUATION:
Mark out some values from the metric rule e.g. 27mm, 136mm, 40mm etc.
ASSIGNMENT:
Draw the shape below in scale 1:1 scale 1:5 and scale 4:1.